Showing posts with label Recipes. Show all posts

Saturday, April 20, 2013

ROASTED VEGGIES


This recipe was fantastic!

Cut veggies into chunks. Use any mix of veggies you like! I used the following:
--1 small head cauliflower
--1 red pepper
--1 yellow pepper
--6 baby yukon gold potatoes
--2 zuchinni
--8 oz button mushrooms
--4-5 green onions

Slurry/Marinade

Puree in blender:
--3-4 sun dried tomatoes (rehydrated in water) I put in small dish and barely covered with water and let them rehydrate then dumped all of it in the blender.
--3-4 fresh basil leaves
--3-4 fresh sage leaves
--sprig (minus stem) rosemary
--3 garlic cloves, finely chopped or grated
--2-3 Tbps low sodium soy sauce
--1/3-1/2 c grapeseed oil
--pinch cayenne pepper
--sea salt to taste (I salted when took out of oven)


You can add any fresh herbs you prefer. The original recipe called for thyme, but I used sage and rosemary instead (because that's what I had on hand).


Toss veggies with Slurry/Marinade.


Spread evenly on baking pan. Bake 35-40 minutes at 425 until veggies begin to brown.


Enjoy!

Til next time ~ find your joy!
Kelly

Sunday, August 12, 2012

BLTA | Our favorite summer sandwich!

Our favorite summer sandwich right now is the BLTA - bacon, lettuce, tomato and avocado - on sour dough (no surprise there).

We made these for lunch this past week.

You start with fresh heirloom tomatoes from the farmers market.  These came from Munson Farms.  They have a permanent stand on 75th and Valmont in Boulder.

A perfectly ripened avocado, sliced.

Fresh sour dough bread.

Thick sliced bacon.

Condiments.  We like Mayo and Smart Balance.

We grill the bread...

and the bacon.

THE ASSEMBLY as demonstrated by Hubby.

Spread mayo on the toasted bread.  Hubby likes just mayo.  I prefer a thin layer of Smart Balance topped with a thin layer of mayo.

A layer of bacon.

Heirloom tomatoes.

Another layer of bacon and tomatoes.  I did a single layer on my sandwich.

A layer of avocado.  Then a layer of romaine lettuce.

Hubby smashed his sandwich while cutting it, so it was not photo worthy, but it was tasty!  You'll have to settle for a shot of my single layer beauty, with my extra tomatoes on the side.

It was delish.

Til next time ~ find your joy!
Kelly

Saturday, August 4, 2012

Thank You, Pioneer Woman! Peach Crisp w/Maple Cream Sauce

I'm baaaack!  I missed you!  The last few weeks of July were crazy busy.  I'll have more on that later, but for now, let's talk fresh Colorado peaches.

Fresh peaches. Yum.


Yes, peaches.  They are finally in season!  We bought our first bucketful from the Frederick Farmers Market this past week and knew exactly what we were going to make with them - The Pioneer Woman's Peach Crisp with Maple Cream Sauce from her first cookbook, The Pioneer Woman Cooks, Recipes From an Accidental Country Girl.  Our oldest daughter has raved about this recipe ever since she made it last year.  Thank YOU, Mrs. Gramith!


O.M.G.  Can you say heavenly and sinful in the same sentence?

Corn Syrup and PURE Maple Syrup...

and some heavy cream...

makes this Maple Cream Sauce.  This is the SINFUL.

For the Peach Crisp, you'll need flour, sugar, brown sugar, cinnamon, nutmeg, salt, cold butter, fresh peaches, zest and juice of 1/2 lemon and pure maple syrup. (flour, nutmeg and lemon not pictured, oops!)

For the crumble mixture, dry ingredients are mixed together, and then you cut in the butter.

I neglected to take a picture of the sliced peaches!  I was so busy stirring the maple cream sauce on the stove while hubby combined the peach mixture and crumble mixture.  Bad Kelly.


The crumble mixture on top of the peaches.

Fresh out of the oven.  This is the HEAVENLY part.

Heavenly and Sinful.  Oh yeah.

Peach Crisp with Maple Cream Sauce

MAPLE CREAM SAUCE

1 1/2 cups heavy cream
5 tablespoons pure maple syrup
3 tablespoons light corn syrup (I used dark corn syrup, it's what I had on hand)

1.  Mix cream, maple syrup and corn syrup in heavy saucepan.
2.  Cook over moderate heat, stirring constantly until the sauce is thickened and reduced by a third, about 20 minutes.
3.  Chill for at least an hour before serving over warm peach crisp.


PEACH CRISP

1 cup all-purpose flour
1/2 cup granulated sugar
1/2 cup packed light brown sugar
1/2 tsp ground cinnamon
dash of nutmeg
1/4 tsp salt
1/4 lb (1 stick) cold butter
5 or 6 cups peeled and sliced fresh peaches (about 6 peaches)
Grated zest and juice of 1/2 lemon
2 tablespoons pure maple syrup

1.  Preheat oven to 350 degrees.
2.  In a medium bowl, combine the flour, granulated sugar, brown sugar, cinnamon, nutmeg and salt.
3.  Cut the cold butter into 1/2 inch square pieces.
4.  Add the butter to the flour mixture and use a fork or pastry blender to cut it into the dry ingredients.  The mixture should resemble a moist, coarse meal.
5.  Place the peaches in a bowl.  Add the lemon zest.
6.  Next, gently stir in the lemon juice and maple syrup.
7.  Pour the peaches into a 9-inch square or 8x12-inch baking dish.
8.  Spread the crumb mixture evenly over the peaches.
9.  Cover with foil and bake for 15 minutes.
10. Remove the foil and bake 30 more minutes, or until the topping is crisp and golden brown.
11. Spoon the warm crisp onto a plate, and drizzle with the chilled cream sauce.

PW says to drink any leftover Maple Cream Sauce with a straw.  Daughter #1 said the leftover Maple Cream Sauce was great on oatmeal.  Both of those suggestions work for me!

This is definitely a keeper.  You can't eat it everyday and keep your waistline in check, but you have to make it once during peach season!

Til next time ~ find your joy!
Kelly

Wednesday, July 11, 2012

Pizza on the Grill

Continuing on our quest to find exciting ways to prepare the chicken sausages we get from Papa Franks/Pete's Place, hubby came up with the idea to make pizzas on the grill.

Can I just say, O.M.G.  I am not a big pizza fan.  Blasphemous, I know, right?  I don't eat many carbs anymore, and pizza weighs me down for what seems like days.  But these pizzas were fantastic!

We started with homemade dough.  We modified the Basic Pizza Dough recipe from Steven Raichlen's The Barbecue Bible.  Let me just say, if you want to learn how to grill just about anything, this is the grill book for you!  We've tried many recipes and techniques from The Barbecue Bible and they've all turned out great!


BASIC PIZZA DOUGH

Prep
2-3 hours for making and raising dough

Ingredients
1 envelope active dry yeast
1 teaspoon sugar
2 teaspoons coarse salt
3 tablespoons cornmeal (original recipe calls for fine 'white' cornmeal)
3 tablespoons ground flaxseed (original recipe calls for whole wheat flour)
1 tablespoon extra virgin olive oil, plus oil for the bowl
3 to 3 1/2 cups unbleached all-purpose flour, more as needed

We mixed our dough in our mixer using the dough hook.  You can also mix by hand or in your food processor.

Place 1 cup of warm water in mixing bowl and add the yeast and sugar.  Stir until the sugar dissolves, then let the yeast mixture sit for 5 minutes.  Stir in the salt, cornmeal, flaxseed and olive oil.  Turn mixer on low and using dough hook, gradually stir in enough all-purpose flour to form dough ball.  Mix until smooth and elastic.  The dough should be soft and pliable, but not sticky.

Lightly oil a clean large bowl.  Place the dough in the bowl, brush the top with olive oil, and cover loosely with plastic wrap.  Let the dough rise in a warm, draft-free spot until doubled in size, 1-2 hours.  Punch down the dough.

Let the dough rise again until double in size, 40-50 minutes.  Punch the dough down.  The recipe makes enough dough for 2 - 9x13 pizza crusts.  We divided it into 3 equal sections so we could make individual pizzas.


The dough after we split into 3 sections.

Set up your grill for two-zone grilling.  In our case, our gas grill has 4 burners, the two on the left were on high, the two on the right were on low.

Stretch the dough on a cookie pan using olive oil. Using oil helps crisp the dough (as opposed to using flour).  Keep stretching until the dough is the thickness you prefer.

We like our crust on the thin side.

Grilling Instructions
Working with one rectangle of dough at a time and using both hands, gently lift the dough from the baking sheet.  Drape it on the grill grate over the hot (high heat) zone.  Within a minute or two, the underside of the dough will crisp, darken and harden and the top will puff slightly.  Using two tongs or a spatula, turn the dough over and move to the cool zone (low heat) of the grill.

Once you move to the cool zone, lightly brush with olive oil (or not) and begin putting your toppings on.

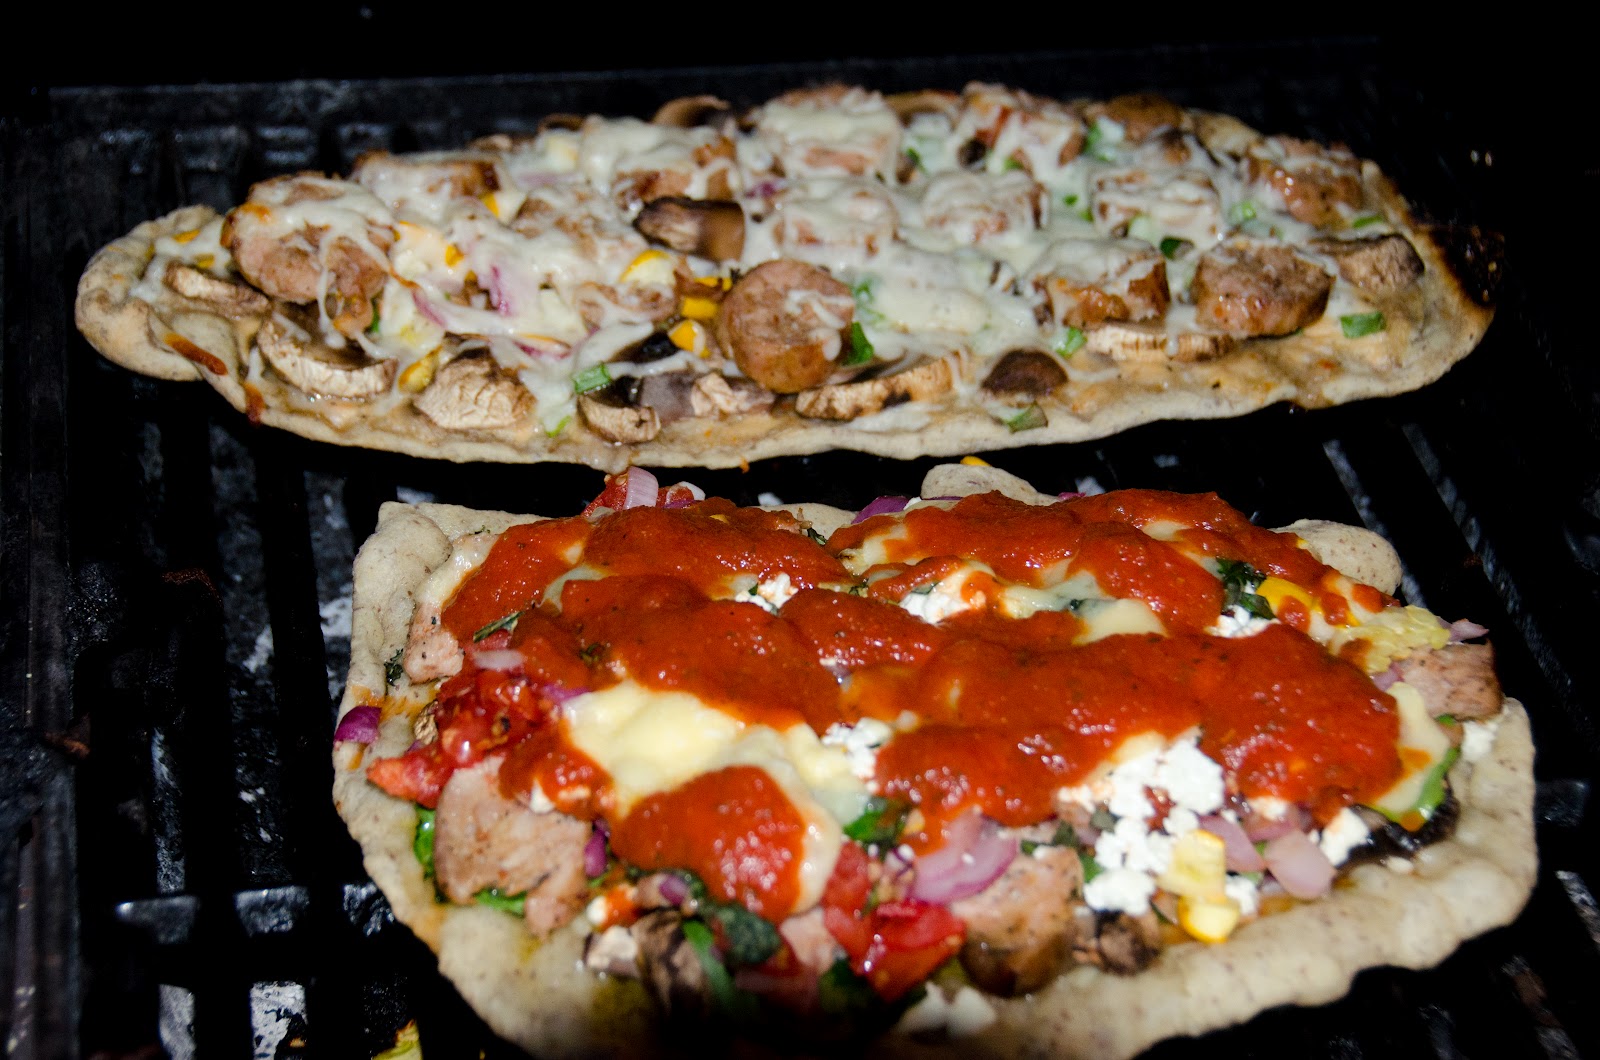
 Can you guess who's pizza this is?

Haley opted for regular pepperoni pizza.  And, yes, there are way more pepperonis under the cheese.  I just added the three on top of her pizza to be goofy.

This is MY pizza.  I used a very light roasted red pepper alfredo sauce and topped with mushrooms, green onions, yellow summer squash, the to-die-for spicy chicken sausage and mozzarella cheese.

We had grilled the sausage and veggies before we started the crusts.  These were the toppings for hubby's pizza... basil, sausage, mushrooms, yellow summer squash, tomatoes and red onions.  Everything was grilled except the basil.  He also added feta, goat and mozzarella cheese.

Jim decided to add a bit of pizza sauce after he'd assembled his pizza.


Once your toppings are loaded on, we grilled on cool zone (low heat) for about 15 minutes or so, until the cheese was melted and golden brown. Haley's cooked a bit faster because she had less toppings, so just ensure you watch it until it's cooked the way you like it!


This pizza rocked!  It's all about the crust!  It was flavorful, hearty, rustic and crisp.  And light.  It didn't weigh me down like normal pizza crust.

This isn't something to do if you're in a hurry, but it makes for a fun family event when you can all hang out and prepare it together.

We're thinking we might actually make a larger batch of dough, do the initial grilling and then freeze the grilled dough to use later.  That way, you can pull it out, defrost, toss on the grill to reheat and then add your toppings.

Yummy!  Yummy!  Yummy!

Til next time - find your joy!
Kelly

Thursday, June 28, 2012

Farmer's Market Dinner!

Today, hubby and I visited the local Farmer's Market.


We filled a bag full of fresh vegetables from Miller Farms, bought two pounds of fresh spicy chicken sausage from Pete's, some handmade tea, and fresh bread.

THIS is what we made for dinner with all our fresh veggies...a hobo dinner on the grill that included zucchini, yellow squash, onions, garlic, red pepper, baby red potatoes and spicy chicken sausages.

We sliced up the veggies, cut the sausage into 1" chunks, drizzled it all with olive oil, wrapped it up in tinfoil and tossed it on the grill for 20-25 minutes.

It was heaven.  Really.  Heaven.

Til next time ~ find your joy!
Kelly


Tuesday, May 8, 2012

Cake Bites

It's finals week for daughter #2.  Two more days and she'll have survived her freshman year at college.  Since she is only 30 miles away, I made a treat for her and her 11th floor dorm-mates.

I have wanted to try making cake pops, but did not have time to run to the craft store to get the necessary sticks, so instead I made cake bites--pretty much the same thing but minus the sticks.

Considering it was my first time, I was happy with how they turned out.  It was a lot like making the truffles I make during the holidays.

CAKE BITES

Ingredients
Baked Cake (I made strawberry)
Frosting (I used store bought cream cheese flavor)
Candy Melts
Sprinkles

I am not a 'cake' person, but everyone else in my family is.  I chose to use a strawberry cake mix for these particular cake bites but you could use any flavor combination of cake and frosting. Using your favorite homemade cake or frosting recipe would be fabulous!

Bake the cake per the box instructions (or recipe instructions).

Once the cake has cooled, crumble into a large bowl.  Mix with the frosting.  Use between 3/4 and the whole container, depending on how moist the mixture is. You want it just moist enough to stick together.

I used my cookie scoop to make the balls.  Since I wasn't making cake 'pops', I left the bottom of the cake ball flat instead of making it into a round ball.  That way they sit better in the paper holders/container.

Place balls on a parchment covered sheet pan and place in freezer for 15-20 minutes or until firm.  This will help minimize crumbs when dipping in the candy coating.

Melt the candy melts per package instructions.  I chose the microwave method.  I added a tablespoon of oil to the melted candy and mixed well.  It helps keep the candy from hardening too fast.

Dip each cake ball into the melted candy mixture.  Let excess drip off.  I can see how this would be a bit easier with a stick!

Immediately sprinkle with your choice of candy sprinkles. I chose to place in regular cupcake holders.

Aren't they pretty?

Til next time ~ find your JOY!
Kelly


Thursday, April 12, 2012

Grilled Tuna Salad

We have used our new grill every day since we assembled it on Sunday afternoon.  We christened her on Monday with two 1 1/4 inch thick rib eye steaks which Jim grilled to perfection then we thinly sliced and put on a bed of spring salad greens.  We grilled asparagus as a side.  It was heaven on a plate.  Unfortunately, I did not stop to take photos...I was too hungry.

Today we grilled Ahi Tuna.

 Each side was brushed with a dressing (recipe below) and seared.

 Sear on high for approximately 2-4 minutes on each side (for medium rare).

 Goat Cheese.

 Freshly chopped tomatoes.

 All placed on a bed of mixed greens.

 Topped with a drizzle of balsamic vinaigrette.

It was yummy.

Dressing:
  • 1 1/2 tablespoons mayonnaise
  • 1 teaspoon honey
  • 1 teaspoon salt
  • 1/2 teaspoon pepper

ENJOY!

Til next time ~ find your joy!
Kelly